Viser innlegg med etiketten decoupage. Vis alle innlegg

23. april 2012

New pendants

It’s been a long time since I made some domino pendants but yesterday I was finally able to update my shops here and here.
All of my pendants are one of a kind. I use magazine clippings, scrapping paper, lace, rub ons, napkins and whatever else I can find to create these small unique collages


If you don’t live in Norway I recommend Pipler. There the prices are in $ and international postage has been added to the products. But I have to warn you, Norwegian postage prices are very high and so is the cost of supplies so I’m not able to compete with sellers that offer similar products on Etsy. (This is why I don’t have any products in my Etsy shop at the moment)


Later this week I’ll be adding these. They are made from a different type of game piece decorated with magazine clippings.

28. desember 2011

2011 summary


As we are coming to an end of 2011 I have decided to do a summary of my 10 most popular posts of this year.  My top 3 had about 3 times as many visitors as no 4 on the list so they are most defiantly in a league of their own.  (I do also have a blog in Norwegian, and the list over there is very different from this one, so if you want to see you can take a look here : )
To see the original post click on the images.
 

Number 10 on my list is shared between two posts. One was my first attempt to make a tutorial and I think it went down well. These posts are number one and three on my Norwegian list so it has boosted my confidence and I’ll be making more in the year to come.



Number 9 was a post about some Christmas stars I folded and my first visit to a craft fair. It was a fun experience and I hope to participate in a few more nest year.


Number 8 are some of my pendants. Domino and puzzle pendants are a passion of mine. All of the pieces are individual and one of a kind. I cut out every tiny bit of paper and glue them on to make unique pieces of art.


Number 7 is my experimental chair makeover.Used my favorite material and covered the chair in paper. It doesn’t go with anything in my house so sadly its still just stuck away in the corner waiting for its true purposeJ


Number 6 were my Christmas bulbs tutorial. I’m so glad you liked it!


Number 5 is one of my repurposed trousers bag. I really like this one and were using it dayly until I made this one.


Number 4 were one of the first owls I did sew together with a matching display shelf. Not sure how happy I’m with this project now, but for a first attempt it wasn’t too bad.

And then we have reached the top 3, they were in a leage of their own and the number one even surprised me a little so here we go:

Number 3: was my suggestion on how to organize your boots. This made my life easier this winter, being able to hover the floor without it turning into a huge project every time. Hope those who tried it found it helpful as well.


Number 2 you’ll find my owls I think their cute and apparently so did many of you J


And my number 1 most visited link this year was my denim bracelets. I like them very much but still didn’t expect them to become so popular. I have gotten a lot of emails requesting a tutorial, and I will be posting one in the first week of 2012.

All in all I’ve had far more hits than I was expecting and I’m very grateful to all of you who have visited me the last year and made my blogging experience so much fun! Hope to see all of you again next year!

Photobucket

10. desember 2011

Tutorial - Christmas bulbs


Last year I started making these Christmas bulbs from old light bulbs. I think it’s a great way to recycle them while they still exist, and they became very decorative.
What you need:

Light bulbs
Glue
Napkins
Christmas images
Paint
Glitter
something you can rest the light bulb on when it’s drying.  I used a roll with ribbon for gift wrapping.
Varnish
wire
Scissors

1.       The first thing I did was to cover the bulb in a napkin. I don’t put any effort into doing this nice because most of it is supposed to be covered up.  


2. Next I start putting my images on. It’s important to put glue on both sides of the image so you don’t get air bubbles.
I start with the biggest images and then fill in the gaps with smaller ones until the whole bulb is covered.


To make the image fit around the bulb you have to cut it in several places. Don’t worry about the image losing its shape because that will not ruin the overall impression. Sometimes I cut an image as much as ten times.


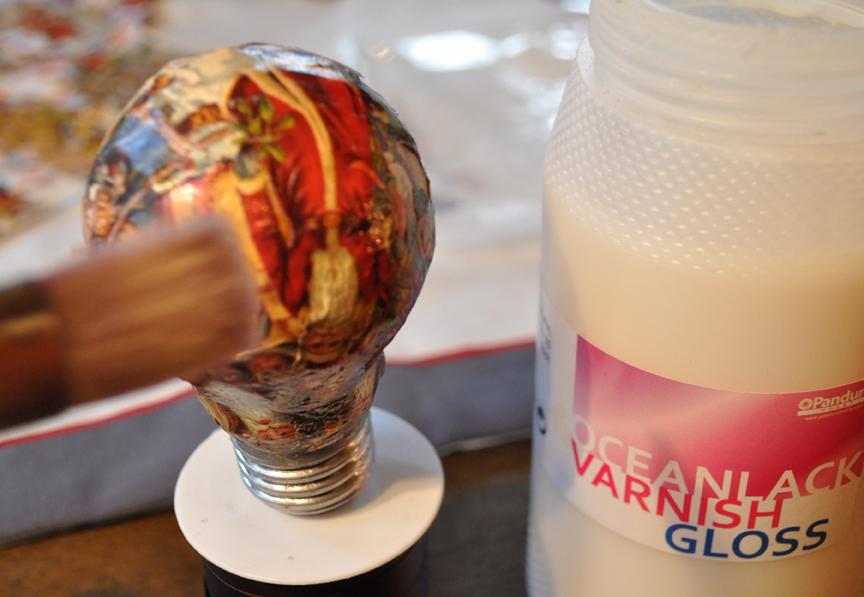
3.Now you need to wait for the bulb to dry before you put on 3 layers of glossy varnish.


4.Then I paint the socket and when the paint is still wet I cover it with glitter.


5.When the paint is dry I wrap wire around the socket to have something to hang it from. 


Photobucket   Chic on a Shoestring Decorating  

8. november 2011

Game piece swap

A while back I participated in a swap on Flickr. It was me and four lovely ladies from the US and lucky for me all of them were willing to ship abroad.
My contribution to the swap can be seen here
I definitely feel that I drew the longest straw in this swap. Just look what I got back… 3 fantastic pendants!


Please visite these lovely ladies here:


28. oktober 2011

Tutorial: Toilet roll giftwrap

I can’t think of anything more ugly and boring than an empty toilet paper roll. But, as with everything else, they too have potential and in this tutorial I’m going to show you how you easily can turn them into beautiful gift boxes.


 What you need:
Toilet roll(s)
Napkin
Glue (liquid, not glue stick)
Something to punch a hole with.
Sticky tape


1: Put glue on the toilet roll with a paint brush. You need to put on quite a lot because the toilet roll is very porous and soaks it up quite a bit. (But if you put on to much the napkin will tear very easily and you might have to throw it away.)


2: Time to wrap the napkin around the roll. I cut the napkin into 4 pieces and threw away the back layers. I lay the napkin on the floor/table and put the roll on top. Then I carefully wrap it around dabbing it with my finger. Small tears in the napkin is not a problem as they will camouflage them self.


Then I put a second coat of glue on top, befor cutting away the excess on top and bottom.
Now it needs time to dry. This is not for people as impatient as me. Because of the amount of glue it takes quite some time. I was planning on decorating the box with a magazine bow to finish it off so I used my waiting time to make a few bows. But when the box was finished they were too big so I’m saving them for my next recycling gift wrap project.


3: When it’s dry you bend the ends against each other so that they slightly overlap and secure them with a little tape. Then turn around, put your gift inside, bend and tape.


4: Getting close to Christmas there is a high risk of you needing to ad a to/from tag on the box. So I used my pliers to punch a hole, pulled a ribbon trough and attached the tag.)


Just to see the difference I made an identical one except I painted the background white before gluing on the napkin. There is a difference, but I'm not sure if it is for the better, so I wont be wasting my time on that step again.
But what I will be doing again is making to/from tags out of puzzle pieces. If I decorate them with Christmas motifs they can be used as ornaments when they are finished being a tag .


Photobucket    Thirty Hand Made Days 504 Main vif187     Link Party    
Related Posts Plugin for WordPress, Blogger...