Viser innlegg med etiketten tutorial. Vis alle innlegg

13. april 2013

Tutorial - potholders


These potholders are very decorative and easy to make. You decide what size you want, but mine are about 6" because that is the size of my square quilting ruler.


What you need:

Sizzors
Fabric, minimum 2 different pattern, but for a more dramatic effect use 4.
Ruler
Fire resistant padding (I got mine from E-bay)
Ribbon


Cut 10 fabric squares (you need 5 for every potholder) and 2 padding squares.


Fold 8 of the squares in half and iron


Put two triangels back to back.


Put the third triangle on top of the square.


Lift up the triangle in the back and put it over the one on top.


Your square should look something like this.


Add the 4.th triangle.


Flipp over the corners on the top and bottom triangle


Put down the top triangle first


Put down the last corner and you should have a square that looks like this.


Take a piece of ribbon and stitch it to one of the corners.


Add the padding


Then put the final fabric square on top of that.


Sew all the way around and cut off the corners


Reverse the whole thing via the whole in the center og the 4 triangles in front.


21. oktober 2012

How to find an image scource.


Today I thought I would share a little tip with you.  Maybe this I common knowledge, but I just learned about it a few days ago. 

I like this page called 1000 kreative ideer - One thousand creative ideas on Facebook and they post a lot of very inspirational images every day. But they do not add a link to the original source which is very irritating when you want to learn more about the artist or the project.   This method I'll show you is also very helpful for those times you find a good pin on pinterest that’s not linked to the proper source or if your just curious to see if some of you personal pictures has been posted by someone else.


All you have to do is open google images in a new page or tab. 
You then go back to your image, left click and drag it over to google. Don’t let go of the mouse button until the image I over the box that helpful enough says “drop image here”. 


Then you do just that, end viola a lot of links appear. 


Hope at least some of you will find this little tip helpful :)

4. februar 2012

Bird feeders


Its been a strange winter with relatively high temperatures.  But that was until yesterday when I woke up at the whole town was white.  And for a few minutes I did actually enjoy the beauty of it… but then I remembered that I had to get to work.  I participated chaos and I’ve never been more right in my life… it took me 2 hours to get to work and that trip would normally take between 20-40 minutes.


I’m not the only one struggling with the winter weather. Birds have a hard time finding something to eat, so last weekend I decided to try to make my own bird feeders.


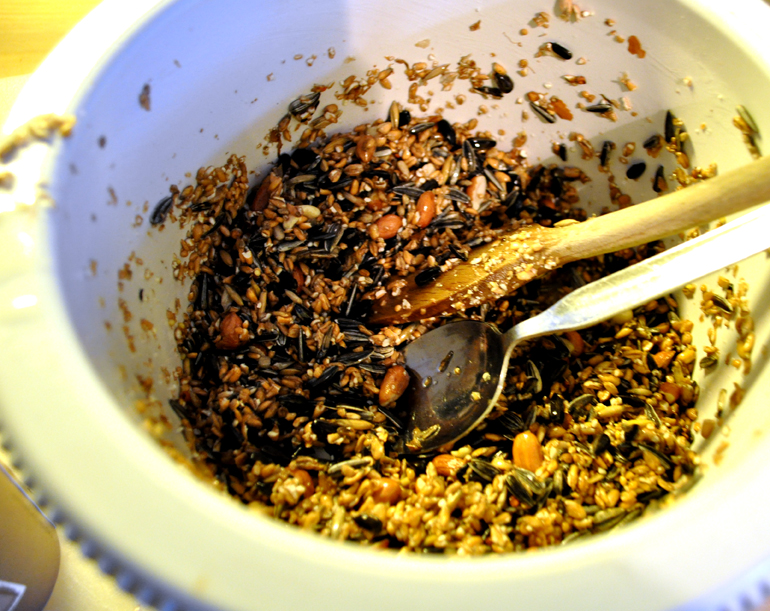
I melted some food fat/oil/lard and stirred in nuts and seeds.


pored the mixture into paper cups with ribbon in it and waited for it to set.


I then removed the cups, hung it from my witch hazel and the birds have been all over it from the first moment.


I was hoping to get a picture of them sitting in the tree enjoying the food, but it was very hard to get close enough and also the curly branches worked as a sort of camouflage for the little brown birds. But the tree is filled with the little things all day and it’s a pretty sight J

  Photobucket 
Pin It

3. januar 2012

Denim bracelet - tutorial


One of my most popular posts last year was my denim bracelets, and I got a lot of requests for a tutorial. So I have decided to kick off the new year by keeping my promise.  


What you need to make these bracelets are as follows:
A worn out pair of jeans
Scissors
Strong thread (I used fishing line for my first one)
Needle
Beads
Push buttons (I’m using a KAM press with buttons that I god from E-bay.)


1.   Select the seam you want to use. You will find several different ones on one pair of jeans. On mine there were 3 different ones.Number one is of no use for this project; whilst no 2 and 3 is ok. Personally I prefer no 3.


2.   Cut out the seam.


3.   Measure the length of the bracelet and add a little extra where the push buttons will be attached. Don’t be tempted to cut it a little shorter because if you use a stretchy denim, because if will not stretch when the beads have been attached. (The needle is only there to hold the seam in place for the picture since I managed to misplace my third hand :)


4.   Now it’s time to attach the push button. Follow the instructions for the type of button you decide to use. Mine probably look a lot more complicated than it is. 2 plastic pieces squashed together with the thong in the picture.


5.   Now your bracelet is finished and all you have to do is decorate it. I’ll show you two different ways to get you started, but I’m sure that all of you creative people out there can come up with several more. (When you do I would love to see so please let me know)


6.   For my first option you need a piece of thread about 2 ½ times the length of the bracelet that you attach to the needle.I could not find my fishing line so I’m using regular thread, but is highly recommended to use something stronger if you want to wear the bracelet more than ones.


7.   Start by threading beads on the string in the length of the bracelet.


8.Push the needle trough the bracelet from the front.


9.   Go back up after about two beads and down on the other side. Continue this for every two beads till you get to the ends.


10. When you reach the last bead put the needle trough it before you go through the bracelet and fasten the tread on the back.


The second one that I’ll show you is a little more time-consuming, but just as easy to make.

1 You will need a longer thread for this, but because it’s very easy to get I tangled up I would recommend changing when you’re half way finished. You start by putting the needle trough the bracelet from the back. (There should be a knot on the end of the tread to secure it.


2 I’m using some tube shaped beads for this and thread one to the string before I push the needle trough the bracelet to secure it.


3 Move the needle a little to the side before pushing it back up, attaching a new bead and pushing it back down. Continue this one bead at the time till you get to the end. Fasten the tread on the back and you have now finished your second bracelet.

I like to combine several different bracelets and wear them at ones.
Good luck to those of you who decide to have a go!




  Photobucket 


Related Posts Plugin for WordPress, Blogger...