Viser innlegg med etiketten china. Vis alle innlegg

3. februar 2014

More candlesticks

These candlesticks are really addictive so here are some more that I have made lately.
They will be decorating my staircase until they find new owners. (My wall is a work in progress, I want it filed with a lot of random stuff so that it becomes a collage)


One is in blue and white with an chinese theme.


This one is also in blue and white with a touch of greyish beige. 


This one is a little more colorful burgundy red and green with the white. 


I like this trio in my staircase so I don't mind if they dont sell :)

27. januar 2014

Candlesitcks from repurposed china

I dont have my own workwshop so I have to use my livingroom or kitchen when I have a project going. But my china jewelery created a lot of dust when I cut the plates so I need to be outside for that. Norway is either very cold or very wet during the winter months so no more jewelery will be made until spring. That made me thing if there were other ways to upcycle cina and in a way tht wasnt as messy. Then I remembered some candlesticks from Anthropologi that I saw a few years back. I googled a little and found the picture again.


Inspired by this I started by going on a treasure hunt at my lokal thrift shops.

Then I spent a lot of tme trying out different combinations and when that was done I had to assemble the whole thing. I realised that the candlestick would become very heavy so just gluing would not be enough. So off to my local hardware store I went to get a metal pole to put i the middle for stabilisation.

Then I had to drill holes trough all the parts, cut the matall to desired lenght and then finish off with some glue.

My first attemt looks like this:


Its 60 cm tall in white and silver. Sadly I realised that noe of the parts had a little crack in it after assembly so I will keep this candlestick for my self.

The next two are a little shorter and they were given away as christmas presents.


25. august 2012

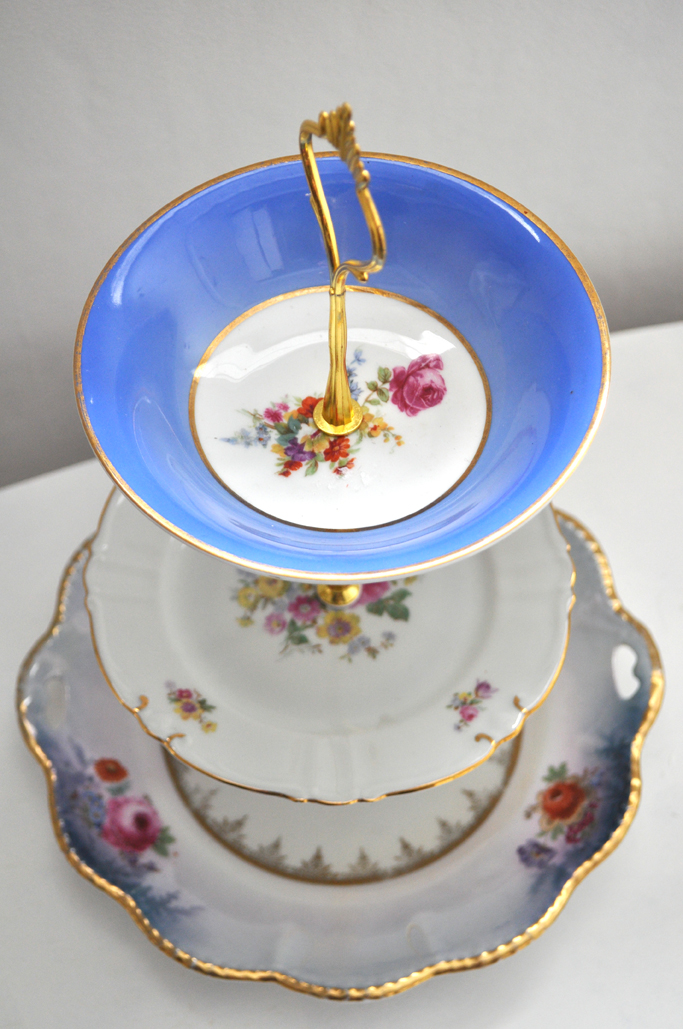
New cake stands


I don’t have access to my craft area and sewing machine at the moment. So when I need a break from work and doing up my house what I have left is my collection of china plates.  So I have been playing with patterns, colors and drilling holes. So far that has resulted in 3 new cake stands and one candy dish. All of them will eventually find their way into my shop.


Also I now have a new all time favorite stand, the blue with flowers on the right. I was considering keeping it for myself for a while, but this house makeover has made me realize that I already have way to much stuff, so what I need is to downsize not add to my collection.


I have been getting a lot of email about where i get the supplies to make these stands so I thought I shold add that information to the post. 
I buy all my supplies for E-bay or Etsy but here is no point of me giving you the name of a specific seller because I need them to ship to Norway so I'm not getting the best deals. But if you search for: "tier handles" you should get some results to choose form. 
I use a 6mm drill bit and it did take some practice. My best advice is to be patient because if you speed up the drill to much its very easy to break the plates. Te drillbits can also be found at E-bay or Etsy.
 

18. april 2012

China plate clock


I’m continuing my task of repurposing old china. I got some clock movements in the post yesterday and even if I’m still waiting for the right drill bit I had to give it a try. I have a very nice plate that cannot be used in one of the cake stands because of a small chip in one of the corners. It’s from the 30s and I could not bring myself to cut it into jewelry so I decided to make a clock.


The drill bits that I use for the cake stands are 1-2 mm to small so it took me a long time to get the hole big enough (serves me right for not having the patience to wait for the right tools.) After that it was just to follow the instructions for the clock movements and put it all together. I am very happy with how it turned out and can’t wait to turn a few of my other plates into clocks as well


7. april 2012

Tea cup flowers


On one of my weekly trips to the local charity shop I came across a 6 sets of super cute tea cups with saucers. They are not old, but who can say no to roses and polka dots, so home with me they came.

Now what… I don’t like tea and I don’t drink coffee. So what else could I do but drill holes in the bottom and turn them into flower pots.


We have had some really strange weather this Easter. Snow and temperatures below 0c are strange even for Norway. But these cute little flower arrangements sure gave me a feeling of spring and a hope for warmer days to come.

25. mars 2012

Cake stands


 I really like decorative ceramics plates so when I go to my local second hand shop I tend to bring one or more home with me. Some of them are in daily use as what they were intended to be used for but luckily we don’t break a lot of plates in this house, so my pile of plates that looks nice but are not needed keeps growing. So I decided to try to find new uses for them and so far they have become pendants, clocks and cake stands. Some of the cake stands were sold on a craft fair a few weeks ago, but the rest you can see here.


Drilling the holes was not easy, especially because the recommended drill bit that turns up when you google the topic is just crap. It’s shaped like an arrow and does only last for 2-3 holes so I started looking for something better. After searching for “diamond tip cake stand” this type of drill bit appeared:


It is more expensive, and at first, not easy to use, but after a few broken plates (that resulted in more jewelry that I will show you later) I got the hang of it. So now I have a life time supply of 2/3 tire cake stands that will go up for sale in my Epla and Pipler shop as soon as I get to take individual pictures of each one


My personal favorite was sold at the fair, but my second favorite is this stand of German flowery plates.
Probably because it reminds me of summer :)


http://savvysouthernstyle.blogspot.com/
http://myrepurposedlife.net

4. mars 2012

More repurposed china


Yesterday I went for a browse in my local charity shops, and the cats of the day were these plates.  All different shapes and colors, but very decorative in their own way.


 If everything goes to plan they will be turned innto something like this.


And if they break during the drilling process they’ll become jewelry.
I got several question about what tools I use to cut the ceramics, so I thought I’d let you in on the “secret”. I use my beloved Dremel, with various diamond tip drill bits. It’s a messy and time consuming job best done outside (Important: use safety glasses) but I find the end result well worth it.

http://savvysouthernstyle.blogspot.com/ http://www.sew-much-ado.com/  http://lilluna.com/  http://thetrendytreehouse.blogspot.com  http://www.gingersnapcrafts.com/  http://www.houseofhepworths.com  http://www.momontimeout.com  http://www.happyhourprojects.com/  http://sassysites.blogspot.com/  http://www.504main.com/  http://www.myrepurposedlife.net/


Pin It

17. februar 2012

Ceramics pendants


I found this great plate from the 60/70s in my local secondhand store. I just loved the pattern but sadly, when I brought it home, it split in half.  I just could not bring myself to just throw it out so I decided to try to cut out the patterned pieces and make them into pattern. It was actually harder than it looked, but after a few trial and errors I got the hang of it. The result is these 6 pendants that will come with me to the spring market at Tou scene on the 11th of Mars.


Pin It

10. juni 2011

Deer or dog


Then the first phase of my "re-use porcelain project" was finished, and I see that I have a few hours of practice ahead of me. This was supposed to be the head of a deer, but now that it's done I must say that it looks more like a German shepherd due to its long snout. But I guess it could have been worse J

I sprayed the frame in a color I call "brushed gold" and used a sheet of scrapping paper for the background.


Related Posts Plugin for WordPress, Blogger...