30. september 2012

Plastic bag dispenser


I’m finally seeing light in the end of the tunnel regarding my redoing projects. But it sure has taken a lot longer than I anticipated. It’s difficult finding a balance between my day job, looking after my daughter and keeping a steady progress on the project.  But finally all that’s left are finishing touches.

To take my mind of things ones in a while I have been crocheting. It’s quite new to me so I don’t have the confidence to take on to advanced projects.  But I found a this blog with patterns on useful objects that were easy enough for me to follow. 


My first attempt was this dispenser for plastic bags. I used t-skirt yarn and followed the instructions up until the end, then I decided that I wanted the opening a little smaller so I crochet a few more rounds while reducing it.


It feels a little bulky now, but I think it will smoothen itself out after being used for a while.
If anyone wonders why the cats for sits high up on a shelf I could assure you that there is a very logical explanation for that. I used to have a dog, a very well behaved one. She would even leave dinner leftovers alone until it was served to her in her bowl.  So with the dogs bowl on the floor and the cats on the shelf all the food got it its rightful owner  :)


This is an old picture of my lovely daughter  and the best friend I ever had. (My daughter is 13 today) The dog, Bambi, is waiting for my her to say værsågod/you're welcome. This caused a lot of frustration until my daughter learned to talk :)


http://savvysouthernstyle.blogspot.com


25. august 2012

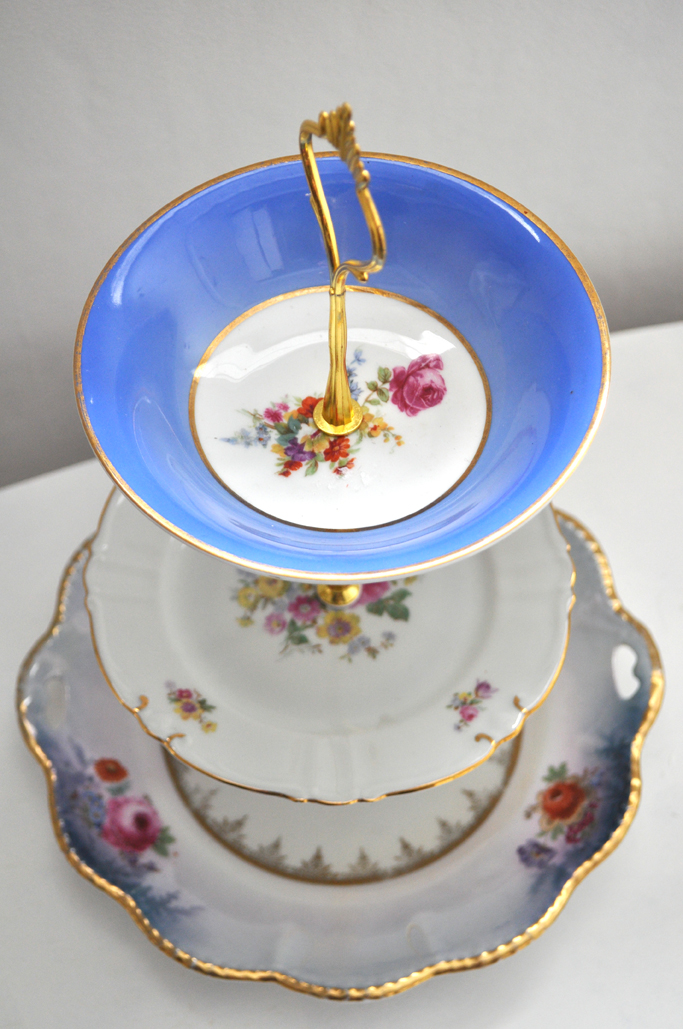
New cake stands


I don’t have access to my craft area and sewing machine at the moment. So when I need a break from work and doing up my house what I have left is my collection of china plates.  So I have been playing with patterns, colors and drilling holes. So far that has resulted in 3 new cake stands and one candy dish. All of them will eventually find their way into my shop.


Also I now have a new all time favorite stand, the blue with flowers on the right. I was considering keeping it for myself for a while, but this house makeover has made me realize that I already have way to much stuff, so what I need is to downsize not add to my collection.


I have been getting a lot of email about where i get the supplies to make these stands so I thought I shold add that information to the post. 
I buy all my supplies for E-bay or Etsy but here is no point of me giving you the name of a specific seller because I need them to ship to Norway so I'm not getting the best deals. But if you search for: "tier handles" you should get some results to choose form. 
I use a 6mm drill bit and it did take some practice. My best advice is to be patient because if you speed up the drill to much its very easy to break the plates. Te drillbits can also be found at E-bay or Etsy.
 

14. august 2012

Crochet shawls

I’m still working on the house so I don’t have much time for creative stuff so I thought I would show you some of the things I got done while I was in the hospital.
I didn’t have room for too much personal stuff so my crafting supply had to stay at the house, but my computer could come so I decided to take the opportunity to learn new skills. So, armed with my mother’s leftover yarn, a hook no 4 and You Tube, I decided to tackle the art of crocheting.


After a while I got tired of making test patches so I got my hands on enough silk/tweed yarn to make a few scarves. My first one was a half granny shawl in grey and the next two were a green and a grey ruffled.


http://savvysouthernstyle.blogspot.com

6. august 2012

New teenage bedroom


Hope some of you still remember me. I’m sorry that the absent from my blog dragged out a lot longer than planned.  My stay in hospital changed from 2 to 4 weeks, and because my immune system was low I picked up every germ that crossed my path the next few weeks after that. But now things are finally getting back to normal. 


Naturally, I haven’t had much creative work done so there isn’t a lot to show you. But since we were not able to go on a holiday this year I decided to upgrade my daughter’s bedroom. It had yellow wallpaper and nothing to indicate that it was inhabited by a teenage girl. 


So first I started by painting it white, and that took 4 strokes and a week longer than anticipated. 


Step two was to decorate one wall with graffiti. I’m lucky enough to have a very talented friend who helped me with that. But because the room has only one window the airflow is not good so he can only be spraying for a short period of time, which means that this stage also dragged out longer than planned. But it was finished yesterday and my daughter is very pleased with the result so far. The third stage is to make a built in sleeping alcove under the tilted ceiling. I’m hoping to have it all finished by the time school starts in 2 weeks. 


As with all projects there are lessons to be learned and this one was that window paint is the devils doing. My daughter made two pictures years ago that she wanted to display. But what’s nice when you’re 6 isn’t very cool when your 13, so they had to go. Easy enough… the only problem would be the sentimental value. Oh how wrong I was… I tried everything; even a sander and it didn’t even leave a mark. Ended up with my hairdryer and a knife and after endless hours I managed to remove enough so that I could camouflage the rest with paint. Had I known it would never have put them up, so to those of you considering to do the same thing I hope you are able to find alternative ways to display your children’s creative artwork. 


27. mai 2012

Stool redo

Still in hospital, the needle in my arm has been replaced with a new one and all the bacterias in my body has been killed except for the ones actually making me sick. But it feels like things are changing so I’m hoping I’ll be able to go home soon.


The last of the projects from my “playing with colors” weekend is this stool. As I do with most of my projects, I forgot to take a before picture. But it had its original silver colored legs and the seat had some sort of fake fur on it. Not really ugly, but very, very boring.

I took some scraps of fabrics and sewed them together to make the seat cover. The legs I covered with strips of fabric that I just twirled around. That bit I was not too sure of so I just fastened the fabric with double sided tape. Think I’ll end up removing it ant spray paint the legs in pink or turquoise instead, but for now I’ll leave it to see if it grows on me.


Related Posts Plugin for WordPress, Blogger...